Free Pattern: Succulent
- Lauren

- Apr 15, 2023
- 5 min read
Updated: Aug 10, 2023

Hey friends, this is a great beginner project, and needs very little yarn. There are going to be some ads throughout this post, but if you'd prefer an ad-free digital download, that will be available for sale shortly (the paid version will have stitch descriptions and detailed project options too!). I hope you enjoy the pattern!
What you'll need:
A ball of yarn in at least one color, two is suggested
A 4.0mm or bigger crochet hook
A yarn needle (and needle threader, if you can)
Scissors
Pins

Optional further projects:
hair clips
wreaths
un-killable potted plants
flower crowns
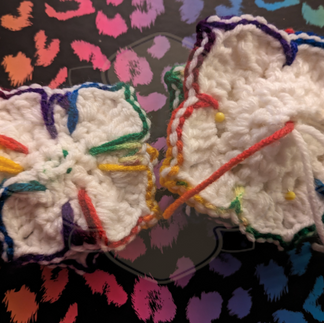
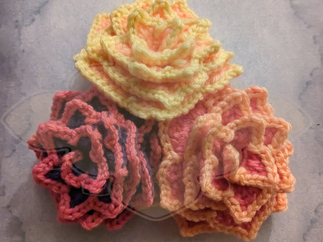
Before you start! There are two petal options, pictured below. Both changes happen in the last row of the pattern, and the instructions for option B are at the bottom of the pattern. Option B is on the right.

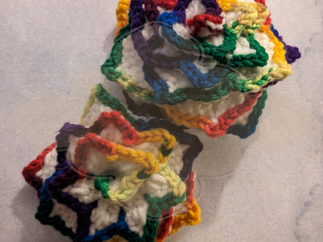
To explain the difference a little better, I have some closer up examples. So version A only has one loop pulled up between petals, which makes for broad petals that point down more than up. Version B uses three loops between each petal, with some of them going towards the center of the petal - this makes the petals a bit more narrow and has the peak of each petal pointing up and staying that way easier. In the pics below, the left side is B and the right is A. The final picture is the pattern done with the spiral finished with the slip stitches down, which has such distinct charm that it's hard to choose between the looks!
Stitches used (and abbreviations):
ss- slip stitch dc - double crochet
sc - single crochet htc - half triple crochet
hdc - half double crochet ch - chain stitch
The Pattern:
After each set of instructions will be a gallery of pictures showing that stage in order.
With 4.0 mm hook (or larger)
Starting with a slip knot, chain 38 stitches. Double crochet into the 4th stitch back. Then skip one chain stitch (on the bottom) and make (dc, ch 1, dc) into the next chain stitch back. Continue making sets of (dc, ch1, dc) into every second chain stitch across until you finish the row.
Ch 3 (turning chain of 2, plus the ch 1) and turn your work, then hdc into the top of the last dc from the row before. Make sets of (hdc, ch1, hdc) into the tops of the next 7 dc from the row below.
After those 8 sets, change over to (dc, ch1, dc) for 12 sets.
For the remaining sets, change over to (htc, ch1, htc). This should be about 16 sets or so.
Ch 1, turn your work, and sc into the top of the last htc from the previous row. In the ch 1 space of the first set of stitches, make a (dc, 2htc). In the next top of a htc stitch, make a dc, ch 2, slip stitch to the top of the dc. Make another dc in the top of the next htc, then (2htc, dc) into the next ch 1 space. Single crochet into the top of the next stitch. All of this is the first petal. For another 3 petals, continue with sc, [in ch1 space (dc, 2 htc)], dc in top of next stitch, ch 2, ss into top of dc, dc, [in ch2 space (2 htc, dc)]. Each of these petals should take up two sets of the V made by stitches below.
For the next 3 petals, switch to sc, [in ch1 space (hdc, 2 dc)], dc in top of next stitch, ch 2, ss into top of dc, dc, [in ch2 space (2 dc, hdc)]. Each of these petals should take up two sets of the V made by stitches below.
For the next 2 petals, switch to sc, [in ch1 space (hdc, 2 dc)], hdc in top of next stitch, ch 2, ss into top of hdc, hdc, [in ch2 space (2 dc, hdc)]. Each of these petals should take up two sets of the V made by stitches below.
For the next 3 petals, switch to sc, [in ch1 space (sc, 2 hdc)], hdc in top of next stitch, ch 2, ss into top of hdc, hdc, [in ch2 space (2 hdc, sc)]. Each of these petals should take up two sets of the V made by stitches below.
Now we’re starting the mini petals. Each of the petals from this point going forward will take up one of the V stitches from the row below.
For the first 6 mini stitches, into the next ch 1 space, (htc, ch 2, ss to top of htc, htc again). Then ss into the tops of the next two stitches below.
For the last 6 mini stitches, into the next ch 1 space, (sc, ch 2, ss to top of sc, sc again). Then ss into the tops of the next two stitches below.
At the end of the row, ss into the top of the first stitch from the previous row. Pull through your accent color (or the same color, if you’re not doing an accent. This row cannot be skipped, it’s important structurally.) and cut the previous color’s tail, leaving enough to sew at the end (12 inches). With that new yarn, ss in the back loop only up to the peak of the first petal, then ch 1, and continue down the other side of the stitch, until you reach the mid point between two petal tips. Pull up a loop through the center of the space between two Vs, then continue your slip stitches and ch1 at the tops. This will separate the petals and give them some lift. Continue to the end of the row, then tie off.
For finishing your succulent, start with the smallest petals. You can curl the succulents with the slip stitches facing up or down, whichever fits the look you’re going for. Curl the smaller petal into a tight spiral, with later rings sitting just a little further out from the center. As you curl it together, make sure to pull the tails through the center. Once the succulent is fully formed, put three pins through the bottom from the outside into the center, and then use your tails to sew through in the same direction as your pins,until the center is secured.
Petal variation #2. For the final row, at the low part of the petals, you will be adding additional loops in two stitches. Instead of working into the lowest stitch with the extra loop, stop at the stitch before that. Your current spot will be in a stitch in the ch1 space of a V. Instead of pulling up from where the stitch is, pull a loop through the bottom of the V stitch (where it comes through from the previous row - see picture). Ss into the next stitch, then pull up the loop from between the Vs as with variation 1. Ss to the next stitch, then pull up one more loop from the bottom of the V stitch that mirrors your first stitch. Do this at each low point between petals to pull your petals up - please note, this points up when the slip stitches are on top when you assemble the succulent.
From here, make a fun pot for your unkillable plant, add some to a hair clip or a wreath, where ever your imagination leads you!
Small version - CH 18, dc into the 4th stitch back and then (dc, ch1, dc) across as you would in the larger succulent. For row 2, do the first 5 sets as hdc, the middle 4 sets as dc, and the last 5 as htc sets. Row 3, make 3 petals that are (sc, [in ch 1 space, (sc, 2htc)], htc, ch 2, ss to top of htc, htc, [in ch 2 space (2 htc, sc)], sc. For the next 5 Vs, [in ch 1 space, (htc, ch 2, ss to top of htc, htc)], then ss in the top of the next two stitches. For the last 3 Vs, [in ch 1 space, (sc, ch 2, ss to top of sc, sc)], then ss in the top of the next two stitches. For the final row, ss and pull up a loop or ch 1 as with the larger succulent above.


Comments